LBT - OutdoorSolarMRT & UTCI

Hi @chris,
I’m comparing the workflow and results of both OutdoorSolarMRT & UTCI components in [+] and Legacy.
Regarding the MRT:
I see that the Legacy options of setting a context and location of the body are not implemented in [+]. I already miss them … :thinking: They allowed to see the influence of the shade. I understand from the example OutdoorComfort that if you don’t plug the mrt input you assume this is a shaded area (no sun) since it has the same outdoors temperature?
I see also that there is a new input, sky_exposure_. Do you have any recommendation about values to give there (0, no sky at all, 1, open space), some rules of thumb? At least until the View component will be available.

The second part is regarding the results, compared with Legacy’s. If you see the attached, the Neutral comfort are pretty much the same. The HeatStress have significant differences between versions. But the ColdStress shows the much higher differences. I see that the Legacy has a % ShortPeriod output. How this was balanced in the [+]? Part of it went to the cool stress and part to the hot, i assume, in such a way that if i look at the numbers thay can be similar in some way.

All this makes sense?
Thanks,
-A.A2_OutdoorComfort_UTCI_AskQuestions.gh (565.1 KB)

Hey Abraham ,

You can rest assured that nearly all of the capabilities that you had in legacy will eventually be implemented in [+]. In the case of context shade, the only thing we are changing is that we’re pulling out the intersection calculations with context into its own components. So you will be able to use the future View components to get the sky_exposure_ and the Sunlight Hours component to get the fract_body_exp_ (or we can add a third component that does these two things simultaneously if managing 3 components is a bit unwieldy). But I am certain that having everything crammed into one component was overwhelming for people in almost every workshop I taught so I felt it at least needed to be broken into two components.

The comf_obj on the UTCI component has way more categories of thermal stress on it than I have exposed on the grasshopper component and you can see a full list on the ladybug-comfort repo. But I didn’t want the number of components (or component outputs) to be so large so that’s why you see just those three outputs on the “LB Comfort Statistics” component, which can be reused of all of the current comfort models. If you want to see any of those other properties on the SDK level, you need only a single line of Python in the “LB Comfort Statistics” component (or a blank GHPython component for that matter). For example:

print(_comf_obj.percent_slight_cold_stress)

… or add another output to the component like _slight_stress and do something like:

_slight_stress = _comf_obj.percent_slight_cold_stress + \
    _comf_obj.percent_slight_heat_stress

Maybe at some point, I’ll release a whole other Grasshopper plugin with many of the comfort capabilities in the SDK that are not exposed on the Ladybug components. But it just doesn’t seem right to flood the Ladybug plugin with a hundred components for thermal comfort when so many beginners use it as their initial means of learning basic environmental design studies.

The most likely reason why your Solar Adjusted MRT does not match between legacy and [+] is that I changed one of the defaults in [+] to something that I thought was more realistic. In legacy, it was always assumed that the human geometry was facing in one direction for every hour of the year but this really doesn’t make much sense from a glare perspective since you have a significant number of hours where the sun is blasting in the face of the human geometry. So, in [+], I decided that the default would be to use a constant SHARP (solar horizontal angle relative to front of person) rather than a constant body azimuth. So, effectively, the person moves their body so that they constantly have the sun shining at a 45-degree angle to their back. If you want to go back to the old way, all that you have to do is plug in a value for _body_az into the “Solar Body Parameters” component:
image

Hey @AbrahamYezioro ,

I just added a new component that I think you will appreciate. It essentially adds all of the geometric capabilities of the legacy Solar MRT component to [+] by computing sky exposure and the body’s exposed fraction for any geometry and position of the human:

By separating the geometric stuff out into another component, I have been able to expose a few more options that were hidden under the hood in legacy.

You can find a sample file here that shows how to use it to evaluate comfort in a street canyon of a certain width and orientation:

https://github.com/ladybug-tools/ladybug-grasshopper/blob/master/samples/comfort_in_a_street_canyon.gh

1 Like

OH YEAH!!! I appreciate a lot!! This is great. Thanks.

Do you mind checking the attached file? I tried to map the UTCI on a grid of points. I’m not sure this is the correct process and will appreciate your insights. It takes a couple of minutes to run. See the bottom part of the canvas.

Thanks @chris
-A.
A2-Thermal Comfort UTCI_LBTools[+].gh (214.8 KB)

Awesome! I was wondering if I should make a mapping sample but I’m glad to see you’re already a step ahead of me :smile:

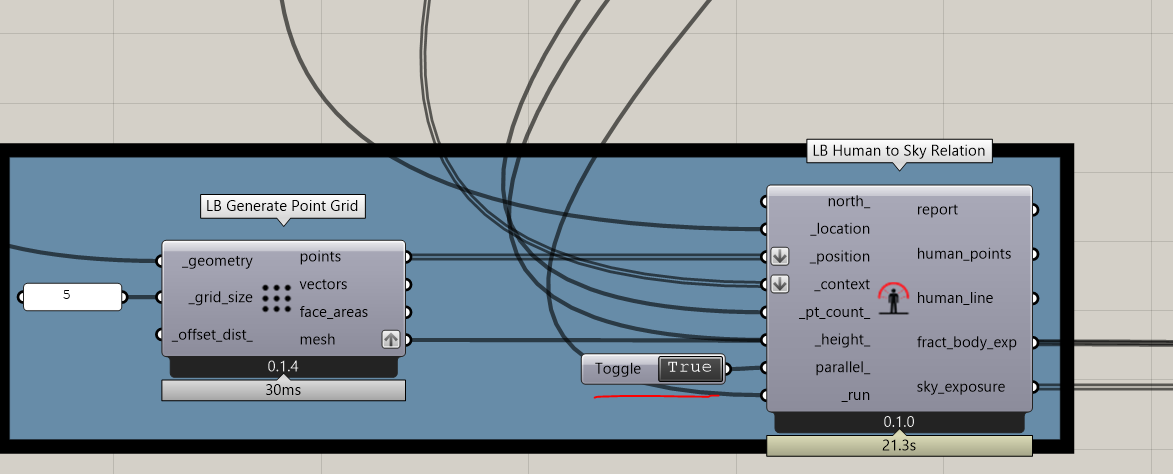
I checked your file and the results are definitely correct, though there are two performance enhancements that I would recommend, particularly if you are zeroing in on a month or a week at a time. First, you can run the intersection calculation that relates the points in the mesh to the geometry in parallel, which gave me a pretty big boost on my machine:

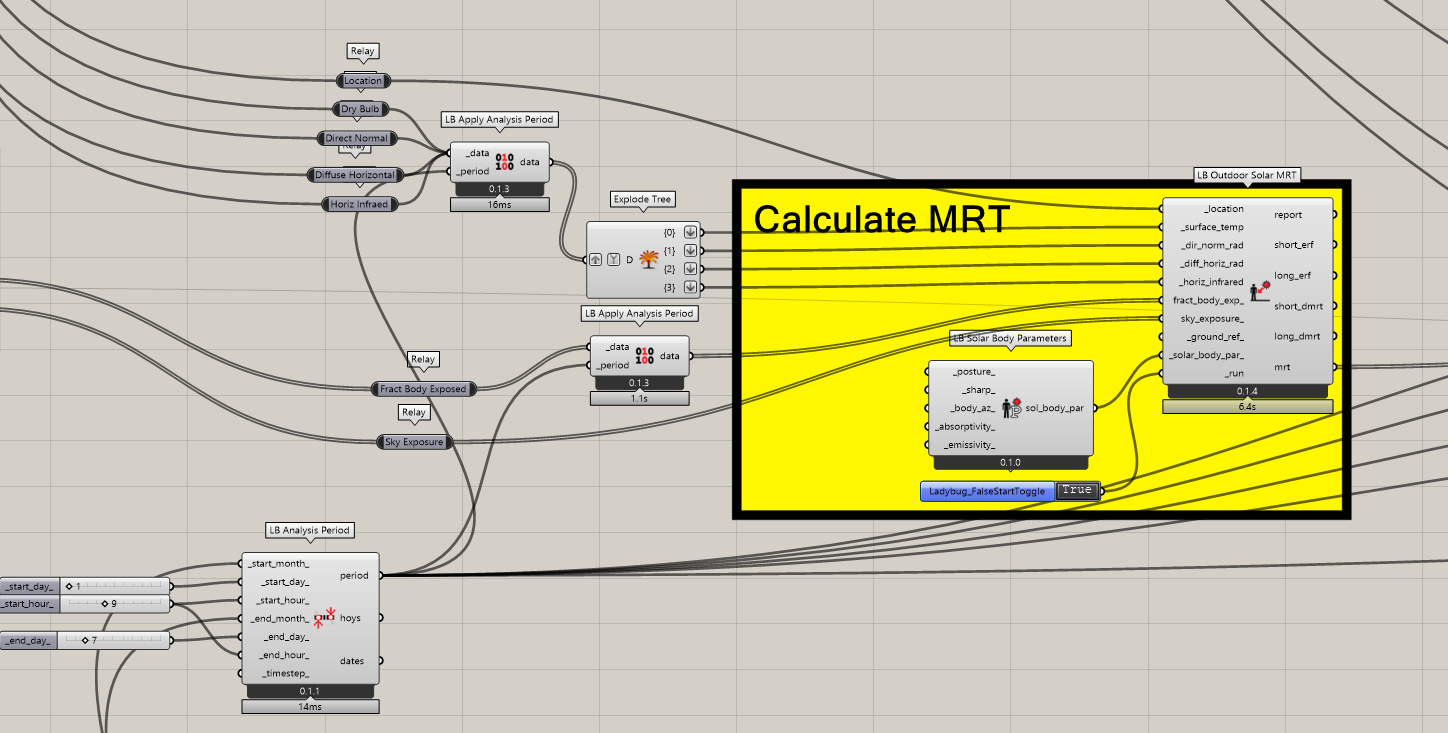
Second, the computation of solar MRT is the longest of the components and, if you apply the analysis period to the inputs of this component instead of the outputs, the whole process will run much faster.


A2-Thermal Comfort UTCI_LBTools[+]_CWM.gh (202.4 KB)

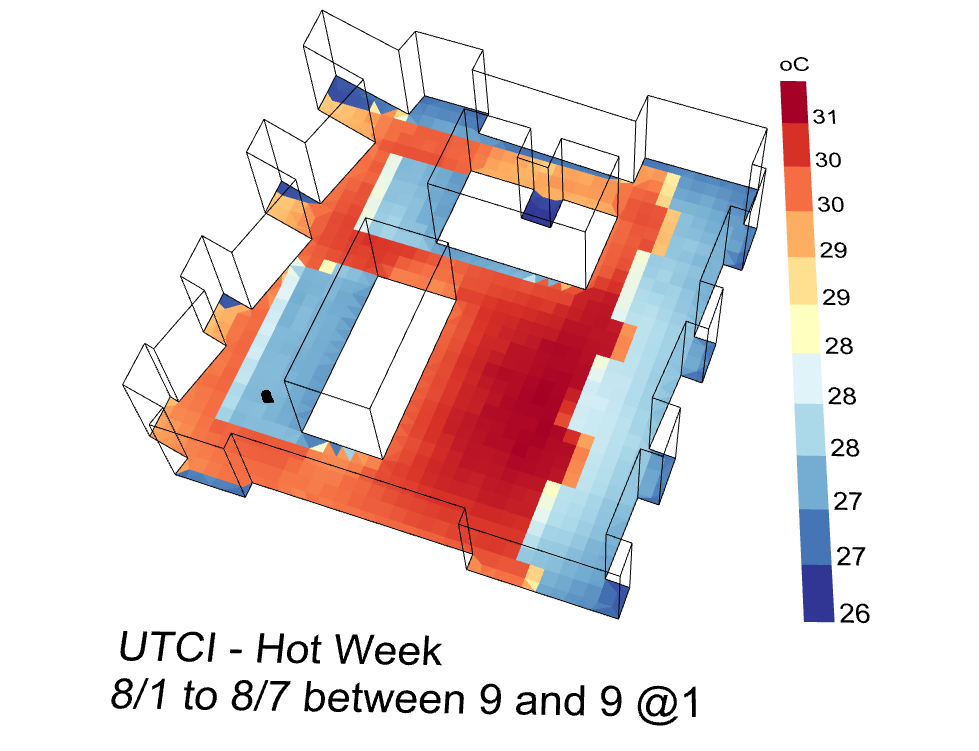
With those enhancements, I was able to drop the grid resolution to 2 meters and have it run in a couple of minutes on my machine.

Given that most of the slowness of the “Outdoor Solar MRT” component results from the calculation not running in parallel for each point, I’m thinking that I can eventually add a parallel_ option to that component that runs each of the _fract_body_exp_ on a separate CPU. But doing this would kinda give preference to the parallelization of multiple points in space over other types of possible parallelization so I think I’ll to give the component a little time “in the wild” just to make sure that this is the use-case that needs the performance boost the most.

Actually, I have one more performance suggestion, which is to flatten the data collections going into the Solar MRT and UTCI components. It seems that this is saving us from some of the overhead associated with Grasshopper’s management of data trees.

A2-Thermal Comfort UTCI_LBTools[+]_CWM.gh (201.6 KB)

1 Like

Excellent @chris,
The 2 mt grid took something like 4:50 min on my computer (which is supposed to be a very strong one). Anything that can improve the performance for such analysis will be more than welcome. But this is much less time than before.
I’m glad i get into this example, though i want to see if it can be simplified somehow. Too much spaghetti.
Thanks,
-A.

Hi All,
I’m looking for help explaining why the results of the Solar-Adjusted MRT components are so different. In the image attached, a simple urban canyon model was used to evaluate the average solar-adjusted MRT on a typical summer day using both LBT methods available for outdoor calculations. The inputs to longwave_mrt and surface_temp have been set to the outdoor dry-bulb temperature in the absence of simulated surface temperatures. The Component Solar MRT method yields results that are on average 4C higher than the Outdoor Solar MRT method. What are the key calculation differences in how each component accounts for short and longwave radiation?