Compare energy Legacy vs LBT workflow

Hi,
I’m working in a basic file where i check the whole workflow, from modeling to results.
In the attached file the top part is the Legacy and the bottom the [+]. I have some questions and issues that i’ll be glad getting advice.
As the files is right now, i can run the 3 modeling options for [+] (see yellow group at the bottom to change options). But the results are not shown at all. The sql is in the results folder but no data is retrieved from it.

I want to create a 4th option with blinds on windows. I can’t find what will be the process for doing that. Can you help on this?

Thanks,
-A.

01_Basic_HB_Energy_mode_ SimpleZone_Case_CompareLBTools[+].gh (1005.9 KB)

@AbrahamYezioro ,

Very glad to have you testing out the new shade workflows here. I think you might have already realized that we have made a clear distinction in the new plugins between the shades that are modeled with Shading:Building:Detailed, (which usually include overhangs, balconies, fins, and extruded borders around windows) vs. shades modeled as blinds, roller shades, and electrochromic glazing. The latter of which you know can be dynamic and they can be either on the interior or exterior of a window surface they are assigned to (unlike Shading:Building:Detailed, which only makes a difference when it’s on the outside)

Looking at your file, I sense that you have a pretty good understanding of the shades modeled with Shading:Building:Detailed. The only thing I will note is that, if you use components like the “HB Louver Shades” or the “HB Extruded Border Shades”, they actually assign the shades to a Window (aka. Aperture) so they get included with the Honeybee Rooms you are simulating and there’s no need to add them again to the Model’s shades (I think you already know this, though).

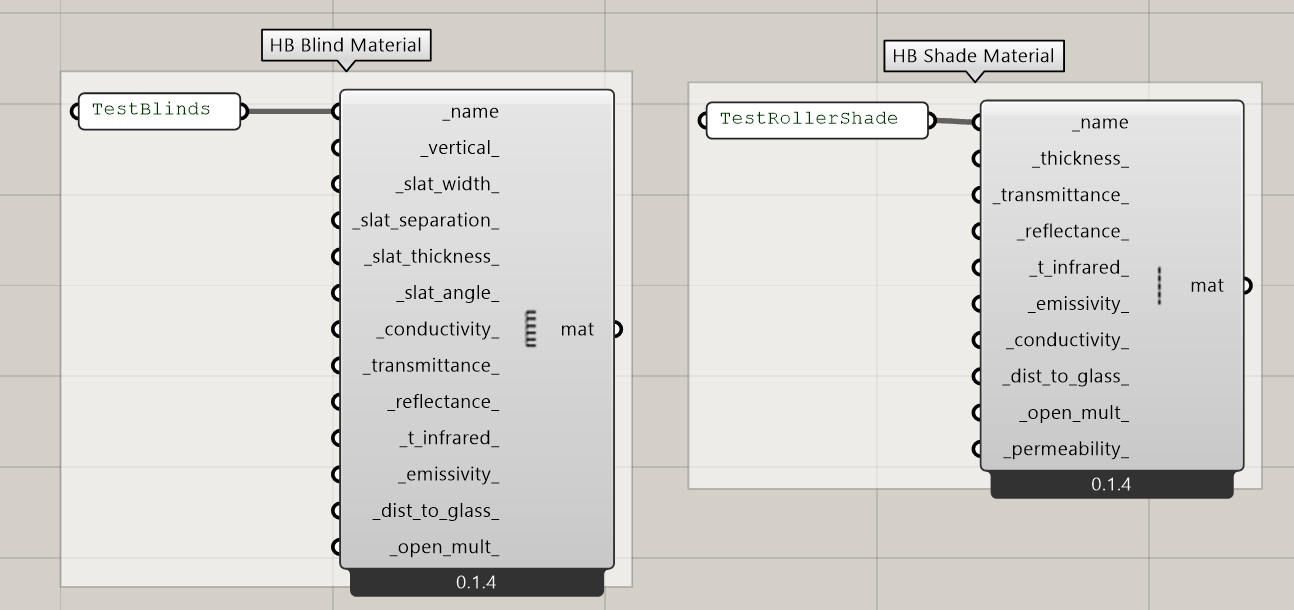
So, if you don’t mind, I am just going to focus the rest of my response on the “HB Window Cosnstruction Shade” object, which is how you model blinds, roller shades, and electrochromic glazing. I see that you have started to get the right idea with this in your file by building a “Window Cosnstruction Shade.” However, I see you using a roller shade material and calling it “BlindTest”, which makes me think that you probably want to use a “HB Blind Material” instead of a “HB Shade Material”

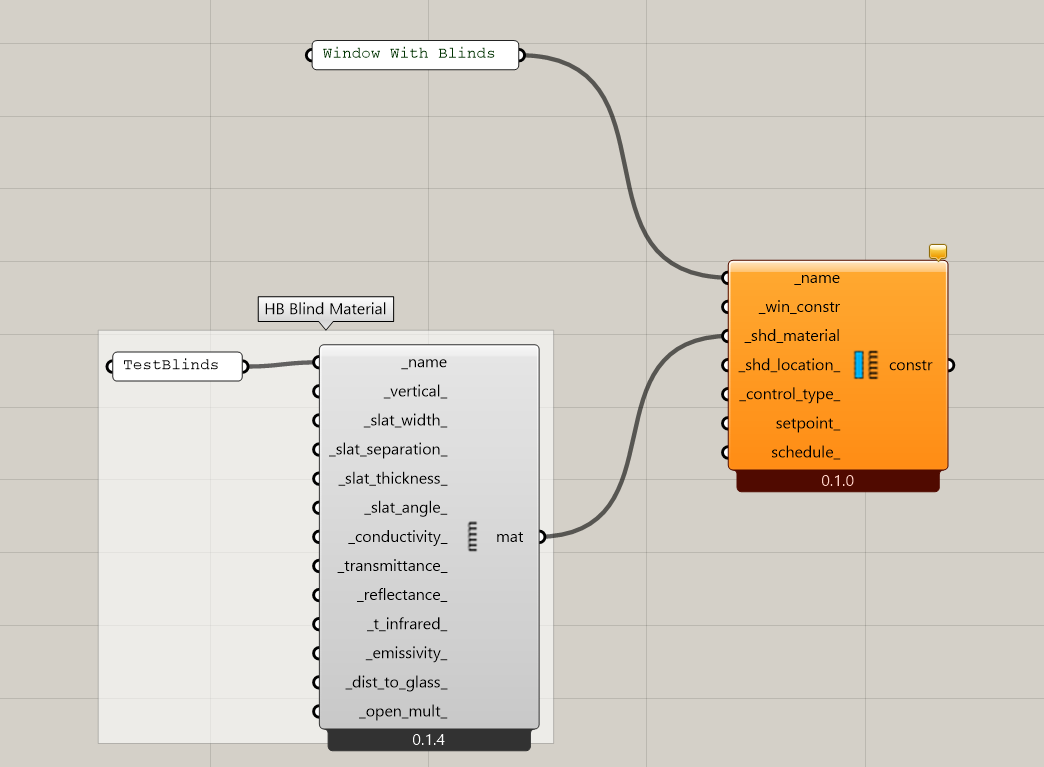
Once you have created a blind with the dimensions and material properties that you want, you then assign it to a Window Construction Shade like so:

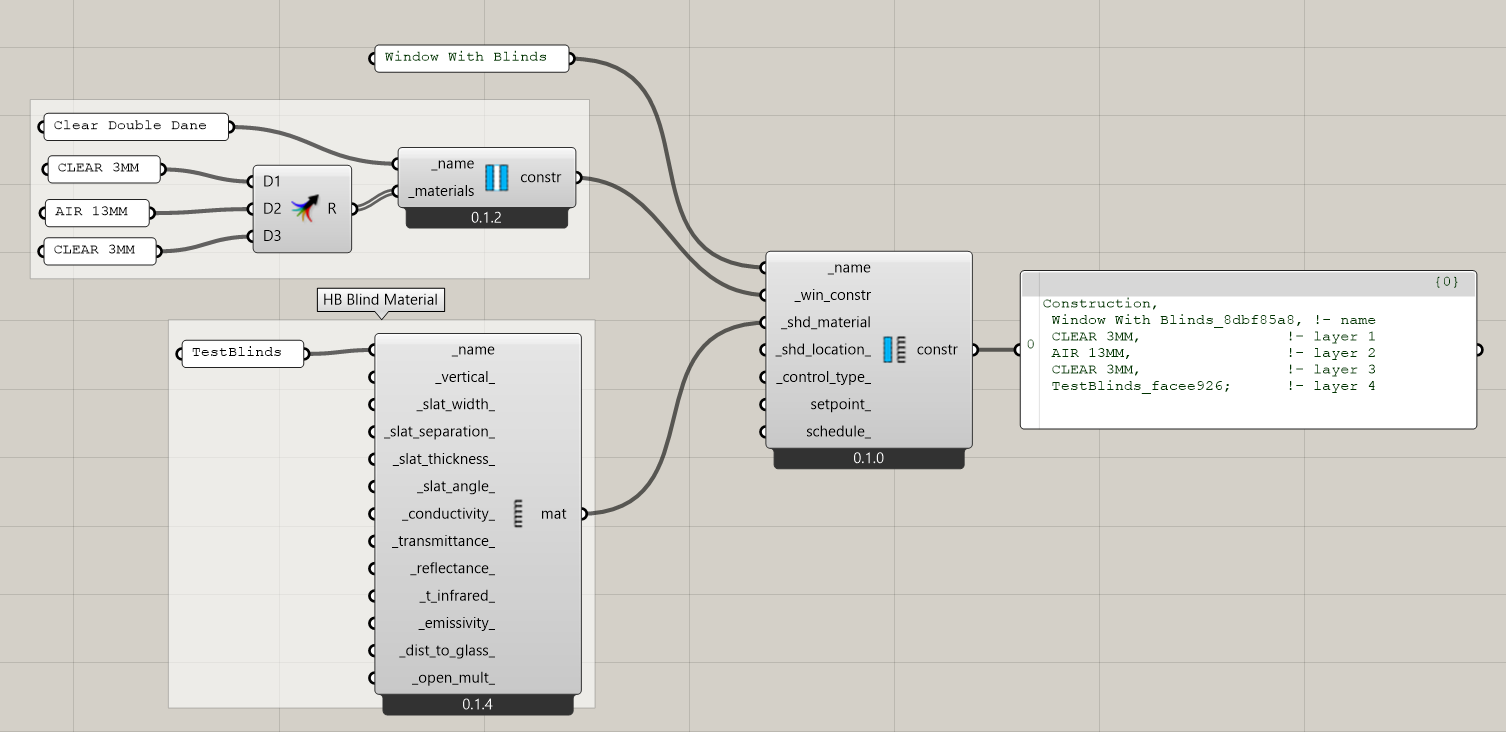
You can see that a WindoConstrucitonshade is composed of both a shade material and a bare “unshaded” window construction. So I am going to put in a bare window construction into my example:


(Note that I could also have just plugged in the name of a window construction that I have in my library into the component)

Now I have a construction object that includes the shade and I can assign this construction to any Aperture using the “HB Apply Window Construction” component. Alternatively, I can also add this construction into a Construction Set and assign that Construction Set to several Honeybee Rooms (this workflow would be useful for the case that I want to look at using electrochromic glazing over a whole list of Rooms, for example). This construction with the shade can also be serialized to JSON and stored in the standards library for easy sharing/reuse.

You will see that the “Window Construction Shade” object also carries information about whether the shade is on the inside, outside or between the glass panes of the bare window construction. And it carries information on how the shade is controlled, with a setpoint or schedule.

Hi @chris,
Thanks. The explanations are clear.
I have a couple of more questions though.

Please look at the attached updated file (01_Basic_HB_Energy_mode_ SimpleZone_Case_CompareLBTools[+].gh (1.0 MB) ).

Some things that are not working:
If you pick Option 4 (in yellow group), which is supposed to be the Blinds, it is failing to run. But if you pick option 3 (shades) it runs fine. There is something related to the controls.

For some of the weather files it complains that no ddy file exists. As a result the simulation is not running.

Will appreciate your help. Tx,
-A.

Hey @AbrahamYezioro ,

Thanks for finding the issue with the blinds. I just pushed a fix:


Give me an hour to have the fix go through all of our integration tests and then you’ll be able to get the fix on your end using the “LB Versioner” component.

The reason why you get the error about design days is apparent if you look inside the DDY file:

There’s no design days and so EnergyPlus cannot do the sizing calculation at the start of the simulation. The easiest way to solve the issue is to just use a location that has design days. If one is not available, then this post on unmethours notes how you can do this with the EnergyPlus Weather Converter Tool. If you have more questions about this, I recommend opening a separate topic.

Hi @chris,
Thanks. I’ll assume that an hour passed and i can make the update. If so, i did. Want to continue report some other errors when you run option 4 on the file.
Now it says:

  1. ** Severe ** WindowShadingControl=“SHADING CONTROL 1” the Construction with Shading Name=“CLEARDOUBLEPANE_5A194706”
  2. ** Severe ** WindowShadingControl=“SHADING CONTROL 1” has Shading Type= InteriorShade or ExteriorShade but matching shading device is not a window shade

The same for Shading Control 2 and 3.

Regarding the Design Days, i’ll see what to do. From what i’ve seen the climate.onebuilding.org does have populated DDY files. The E+ source doesn’t have them, just for one location. After i see this better i’ll open a new issue.
Tx again @chris,
-A.

Ohhhh … I updated right now (again) and it works fine for option 4.
Please disregard the above message.

Just the DDY thing remains open …

Tx,
-A.

Yes, sorry, I should have given myself a little more than the hour to complete the update. It should all be fixed now.

Yes it is.
I see that also the ddy error is solved and the simulation runs just fine.
T H A N K S !!! A lot.
-A.

Hi again @chris,
i’m dealing now with the results. So far so good. I’m happy that getting the numbers is much simple now. I probably didn’t think about all cases, but checked a good few.

Have a couple of questions:

  1. Regarding the TimeIntervalOperation (TimeOp). I don’t see differences when i ask for average or total input options. For both i’m having the same results. Any insights you can share on this?
  2. Regarding the Legacy Split2Floors component, i can’t find the equivalent for it. Is there some workflow that you recommend instead?

Thanks,
-A.

Hey @AbrahamYezioro ,

Glad that you hear that you are getting a hang of the new workflows. To answer your questions:

  1. The TimeIntervalOperation component is working fine on my end. For example, here’s total daily solar radiation:


    … and here is average:

    If you can post a specific example of what’s not working on your end, I can invetigate.

  2. All of the legacy functionality associated with splitting building masses to simulate-able Rooms has been moved from Honeybee to Dragonfly. If you look through Dragonfly “Create” tab, you will see components that are intended to make entire simulate-able buildings from Rhino solids or footprints. And every dragonfly building is translate-able to a Honeybee Model as you can see in the samples on the dragonfly-grasshopper repo. You can see that we even have more robust core/perimeter zoning implemented in Dragonfly, which Saeran recently put together:

The goal with moving all of this functionality to dragonfly was to make it much easier to build large, urban-scale energy and radiance models by giving people a “level of abstraction” above Honeybee. Within dragonfly, the finest level of detail that you work with is Room floor plates, representing extruded solids. And, if you need to go down to more detail below this, you just translate the Dragonfly model to (a) Honeybee model(s).

The start of this presentation that I gave yesterday has some more animated GIFs showing the dragonfly workflows.

Hi @chris,
Thanks for the detailed response. As for the TimeIntervalOperation it was my mistake. I connected a value list and omitted the " " characters. Now it is fine.
As for the modeling part i’ll take a look at the examples and presentation.

I have a wish, now that all modules, seem to be related and you need to go from one to the other: If they can stick together at the tabs level. Usually they change places from login to login. Also when you have many plugins you have to, literally, find the proper tab. From what i searched it is not possible, but maybe you can do your magic here … :thinking: :wink:

I’ll keep checking. Thanks again,
-A.

Good to know the time interval operation is working on your end.

I don’t think David Rutten exposed any settings to change how Grasshopper loads the installed plugins when it starts up. So I would put the chances of us being able to change the order of the tabs in the toolbar as very low. What we should be able to do pretty easily, which will help people with many different installed plugins, is give a unique icon to each of the tabs when using icon mode. You can get a sense of what this would start to be like if you drop the legacy Ladybug_Ladybug and Honeybee_Honeybee onto the canvass and switch the tabs over to icon mode:

Would implementing unique icons like this for all of the Ladybug Tools tabs improve your situation? If so, we can open an issue about it and address it when we get the chance.

10 posts were split to a new topic: Add icons for eah tab

Hi @chris,
This topic is wide enough to include almost anything. Sorry for that. But since it is for debugging i believe it can be fine.
The question here is about recommended workflow defining adiabatic surfaces.
The attached file, at the bottom part has a yellow group with the way i tried to do that. On this shoebox i want only one surface to be exterior and have windows. All other are supposed to be adiabatic. It works but i’m not sure if this is THE recommended way. Don’t want to adopt bad habits on this.
So, if you don’t mind taking a look and see if this is what you will do.
I’m not sure what should be the process when you have more than one zone. For internal walls the solveAdjacency or the make Adiabatic are good. But if there are some exterior surfaces, there is other option beyond exploding and rejoining?

Thanks,
-A.
03_Basic_HB_Energy_ SimpleZone+Materials_CompareLBTools[+].gh (1.0 MB)

Hey Abraham,

You were right to ask about this as there are definitely much more elegant ways to make the surfaces adiabatic and there’s no need to deconstruct the Room in this case. If you are only making a single-zone model, the route with the least number of components is probably just to build the model from honeybee faces like you see in this simple shoe box sample.

However, if you want to use the “Room from Solid” workflow as opposed to the face-by-face route, you can use the “Make Adiabatic” component like so:


03_Basic_HB_Energy_ SimpleZone+Materials_CompareLBTools[+].gh (1.0 MB)
You can see that it accepts Rooms as the _hb_objs and you can use the “Facade Parameters” component to assign different adiabatic properties to walls of different orientations.

FYI, I realized there was a bug in the “Make Adiabatic” component where it wasn’t interpreting Ground Faces as something to be set to adiabatic. I just merged a fix:

Hi @chris,
Thanks. It is working but …
Building the geometry from faces can work but is not a common workflow (for me). That’s why i didn’t explore the option. Now that i know what you suggest to do this is a much better/cleaner way than exploding and joining faces.

Not related, the Scale component has an error in the origin input. It is set as float and should be 3DPoint or other that allows a point.

Thanks,
-A.

Thanks for finding that issue with the scale component. I just pushed a fix for it:

A post was split to a new topic: What is the Equivalent LBT Workflow for Legacy “Set Adiabatic by Name”