Using Honeybee THERM to Calculate Psi-Values

Here is a question I’m thinking about for a long time. How are thermal bridges taken into account in HoneyBee and how can we set them in HoneyBee Tools ?

I always specify these values in other softwares (DesignBuilder, Ecotect, …). And not knowing how this works here keeps me from using HB completely.

@chris that is fantastic, thanks! - I’ll take a look at the updated component structure and see how I can revise the Psi-Calculator portion to work more effectively / automatically and will post an update.

@EmmanuelR for Honeybee / Energy+, ‘Thermal Bridges’ are taken into account in two ways:

  1. In the U-Factor any ‘repeating’ thermal bridges from studs or similar items are taken into account in the determination of that U-Factor value (w/m2-k or Btu/hr-ft2-F)

  2. For what are considered ‘construction’ or ‘geometric’ thermal bridges (with Psi-Values, in w/mk or Btu/hr-ft-F), these are not directly taken into account in Energy+ I don’t believe, but you can use a workaround to add the extra heat-loss from these effects into an Energy+ model through the use of an ‘OtherEquipment’ object so that the effect on the zone thermal balance is influenced by this extra heat loss and the energy/load calculations will register this. See here for more info on this method: https://unmethours.com/question/8758/clarification-of-energyplus-otherequipment-impact-on-hvac-loads/

Another method is the way DesignBuilder does it, but as they state in their reference guide, since E+ doesn’t include Thermal Bridge objects by default, some funny business (creating a fictitious wall with the equivalent thermal conductivity) is needed in oder to take these thermal bridge effects into account:

Anyway, I’ll try and add an implementation of folding these Psi-Values into an E+ mode to a more complete example file once I have the Psi-Value calculator working better and I’ll add that here for your thoughts.

thanks,
-Ed

1 Like

@chris has put a sample file together that shows how to do that. Look for this component:

1 Like

Thank you @mostapha and @edpmay, this is really helpful !

Hi,

I’m trying to learn Ladybug and Honeybee in depth, just started a while ago - this is my first post here.:slight_smile:

@edpmay
In the first example you posted, there is a Psi value of +0.20737 W/mK (the simple stud wall). I’m evaluating your script, and noticed, that for me it is -0.127697 W/mK.

The heat flow is also different in the first line for the detailed 2D simulation.

I am using the latest Ladybug (0.0.66) and Honeybee (0.0.63), I have just installed them according to this guide:

I’m in the process of learning the underlying physics as well, so I would like to make sure that I can follow along the examples posted here and Hydra, and troubleshoot when I see differences like this.

I was also having the “WindowsError” with the writeTHERM component, which I managed to resolve - changed all the working directories to mine, changed the unit tolerances to the required 0.00001, set the “Save Conrad results file (.O)” in the THERM simulation preferences. It didn’t work. So I’ve quit Rhino and Grasshopper and started it again as admin, this time it worked. Please bear with me, I’m getting used to Windows again, feels like I’m shooting in the dark, I’m not yet confident what I’m doing.:slight_smile:

I hope you can find the time to explain my questions.

All the best and thank you for all these valuable resources!

Hi furtonb,

My apologies for the confusing set-up there - my setup is still pretty half-baked here and the reason you are getting the answer of -0.127 W/mk is because you need to update the ‘Select Item’ to the right input:

if you change that to 'Ext_Detail - Total Length" you should get the same answer as I show in the above description.

When I get a chance I’ll try a post an update to this workflow / component and make all more ‘automatic’ and flexible and hopefully I can find a nice way to remove that entire ‘reference length’ input section. Let me know if you still can’t get the same answer there though once you update that reference length.

good luck!
-Ed

2 Likes

This worked, thank you! Perhaps I should look closer…

Hi Ed! Great work again with this examples. I came back to them with a project taht we wanted to look at some of our envelope conditions, however I noticed that the python script for the psi-value calculation is running into an error. I updated all of the components, but I wanted to see if you had any thoughts on the reason or if you had an updated workflow.
Thanks!

-Emmanuel

Hi @emmanuelgee,

shoot! sorry about that. Sadly no, I haven’t had a chance to revisit this and clean up the workflow to be more robust just yet - its been sitting in my ‘to-do’ pile. I’ll try and carve out some time soon to dive back into it and clean it up though.

In any event - for now, if you can upload your GH file I’d be happy to take a look and see if I can sort out where the error is happening? Or if you can show what the specific error you are getting is?

best,
-Ed

Hey Ed,

Thanks for responding…we all have that “to do list”! Sorry, I thought I attached a file with the error, it seems to be with pulling the deltaT and ufactor lengths from your python script. @chris updated the honeybee read therm result component and it now has that information pulled from the therm file directly however that data is in meters. Ultimately, the script that calculates the heat flows and Psi values are running into an error with the deltaT conversion. Your script is merging the trees for the two simulations, which I get for sorting but it seems like the heat flow calculation is running into a loop error. I am not a python person, so I am probably wrong. Here is the updated attached file. Thanks for your help!

Psi_Calc_Example_170725 [Internalized].gh (757.9 KB)

Hi @emmanuelgee

Ah! I get ya now. Yes I did update that workflow after @chris updated / modified the ‘readTHERM’ component to output the required information directly. But I think maybe I never posted that did I? Anyway - yes I’ve now modified these custom components and workflow to make it a lot simpler this time around (and to work with the updated readTHERM) and you can find the modified example attached to this message. A couple specific points:

  1. Everything is ‘internalized’ for easy posting here, but it might be more clear how its put together if you bake out the Boundary Curves
  2. The only components now are a ‘Heat Loss’ and the ‘Psi-Calc’ and they are much simpler than before (I think). Hopefully they are more flexible now as well"
  3. I’ve included 3 examples (same as before) and hopefully they are obvious - but of course give me a shout if anything in there is confusing.
  4. The workflow is now done using two (or three) separate THERM models for each detail. While this isn’t strictly needed - I think it makes it a lot more obvious what I’m doing here and makes it easier to track items / issues. So you do a ‘Full Detail’ THERM and a ‘Clearfield’ THERM, and then use those to calc the Psi-Value:
  5. Once you run the two THERM simulations, the Psi-Value elements are quite simple: you just calc the total heat loss (SI inputs only for now) from each THERM result and compare them. To do that, add a ‘Heat Loss’ component after each ‘readTHERM’, then feed those into the ‘Psi Calc’ component:
  6. Note that the part I can’t quite yet sort out is how to automate the ‘Length’ being used to calc the ‘Predicted’ clearfield heat loss. There are just so many possible combinations that might be drawn, I can’t quite figure out how to determine it automatically from the already input values and geometry. I’ll keep thinking about it though cus’ I’d love for this to be easier / more error-proof. For now, I have it so you just describe the length either using numerical input (so just measure it and input the value) or using a ‘Curve’ input and it’ll calc the length itself:
  7. I think this is most obvious in the ‘Parapet’ example here - the roof ‘clearfield’ and the wall ‘clearfield’ would intersect at some point which is not part of any of the input geometry, nor determinable from the input geometry without at least some small ‘tagging’ by the user:

    If you knew something constant about the geometry (always would be X/Y, always would be vertical, etc…) there could be a way to pull all this from the input geometry. But that geometry could take so many forms that figuring out which clearfield goes where is tough. If you have any ideas for that though let me know and I can try and implement them and test?

at any rate: this should hopefully work for you now. I think I’ve updated all the HB components to the latest version of all and modified all my inputs to match. Take a look at the attached .gh file here though and let me know if you have any trouble with it.

best of luck!,
-Ed

Psi_Calc_Example_190917 [Internalized].gh (804.0 KB)

2 Likes

Ed, thank you that’s great! Maybe I missed an updated file, but in any case, this will save time from writing out the equations. Thanks for sharing this work, its a great workflow! -Emmanuel

Hello Ed. I attended your workshop at RPI last November and it was great! Thank you for sharing your knowledge and tools! I’m trying to learn Ladybug and Honeybee as well as Grasshopper in general this summer.
I have a question. I built a parapet detail and placed it in your file (Psi_Calc_Example_190917 [Internalized].gh). The Python Script (Heat Loss) component shows a warning saying: “1. Pipe: Vicarious argument deduced from defaults at position 2. Add value for ‘caps’: ‘0’.”
I have no idea how to solve it with my level of skills. Is it serious? Does it affect actual calculations? Everything else seems to be working well.
I also ran a simulation on your paraper geometry stored in file and it has the same issue. It may be happening because of newer HB version, but I can’t be sure.
I hope it is not stupid question. Let me know if you have any ideas.
Thank you in forward.

Hi @sholoa

Good to hear from you! Glad to hear you are jumping into the GH/HB/LB world. And yes, happy to advise:

I am sorry about that error, thats entirely my fault - I was sloppy in my code there and left out an input that I should have included. To help visualize, it’s attempting to make a ‘pipe’ (extrude) along a line segment in the scene and the ‘pipe’ command actually requires two input parameters, but I only gave it one. So it’s saying it’ll be using a default for the missing argument.

But no: it’s not serious at all and won’t affect the calculations - its just a warning about the visualization of the geometry in the scene and telling you (me) that I wasn’t as explicit as I should have been in the code. Luckily it’s smart enough to handle that mistake though. So don’t worry about it - it’s just related to the way those ‘thick lines’ show up in the viewport to help you see whats going on there. I’ll definitely fix it up though and will post a revised definition when I have a chance to take a closer look.

For sure let me know if you run into any other questions of hiccups though! Happy to take a look.
best,
@edpmay

Thank you for answering!

Thanks for sharing Ed!

@edpmay
Hello Ed!
I was wondering if you might have an updated link for the two files that you linked to in July 2018:

  • Part 1: THERM for Beginners
  • Part 2: THERM for Intermediate Users
    It seems the files are no longer there but I expect they’d be able to help out a few folks. Is it more that they have been replaced with newer files or have they been renamed.

Thank you so much, it is incredibly appreciated!

Woops! Sorry @JDev

I had updated some website stuff and relocated those files. You can find them now at:

http://www.bldgtyp.com/resources.html

Note that is a bit updated from the original ones I posted back in 2018 and bit more comprehensive.

Note also that if you are interested, we’ll have a brand new video-course/series on the detailed use of THERM for Psi-Value calculation coming out soon through NAPHN. Keep your eyes out for that coming in the next few months.

best of luck with it.
@edpmay

1 Like

Hi @edpmay , I’d like to ask how to implement the Psi Values into HB model using LBT?

Hi @fn

Unfortunately EnergyPlus does not have a built in method for handling thermal bridges that I know of. There are some methods I have seen used in the past as ‘work arounds’ but I think the best method for accounting for those construction thermal bridges at this point is to build in their effects into the U-Values of the building.

This method is not great, and is a lot more complicated than just having the ability to input Psi-Values and lengths, but we don’t have any option in E+ currently, so its probably the best we can do. (In WUFI-Passive or PHPP, by contrast, we can input Psi-Values quite easily).

For a detailed explanation, I would recommend checking out the ASHRAE Handbook of Fundamentals, Chaper 27 (27.6: 2016) for an explanation of how they recommend incorporating things like slab-edge thermal bridges into your U-Factors.

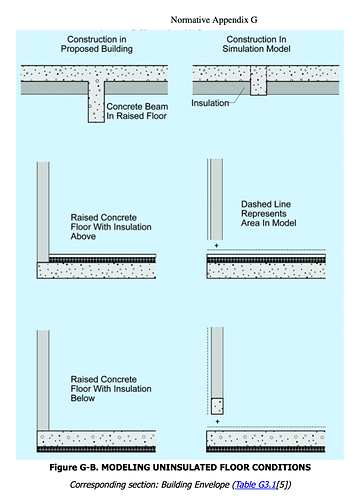
You can also see some other examples of a different way ASHRAE recommends doing this type of thing in their 90.1 Appendix G, Users Manual, ‘Building Envelope’ section. They recommend (require?) that certain thermal bridges are included in this manner, primarily the ones related to the floor-slabs and concrete beams.

Again, neither of those processes is not ideal, and are overly complicated and lead to needlessly complicated models. But its the way(s) they recommend right now, so far as I know.

Until the E+ software is capable of handling Psi-Values, this would be the only option I’m afraid.

All the best,
@edpmay
3 Likes